Thursday, May 16, 2013

Mini Meat Pies


Following our Game of Thrones themed birthday party, we had an insane amount of leftovers. The small amount of lamb still leftover two weeks later was easily dispatched by our dogs (they liked it almost as much as when they got to devour blue cheese filet mignon last week -- yeah, these dogs are ridiculously spoiled). The only thing left was a bit of rabbit stew. Super delicious and made by my mom -- who will perhaps post a recipe here one day?!

So today I finally got off my butt and decided to use our leftovers for good! And hence rabbit muffins. Or... Stew scone? Bunny bread? Carcass cupcake? Yeesh, okay, I'll stick with mini meat pies.


Ingredients
Leftovers
Pie crust

Pie Crust
[For 12 mini pies.]
2 cups flour
2/3 cup shortening
1 tsp salt
~1/2 cup cold water

Procedure

Mix flour, salt, and shortening together using a pastry blender until you have a fairly homogenous crumbly mixture. Add in water, a little bit at a time, and stir with a wooden spoon until the dough forms a ball. Roll it out (depending on your work surface, you may want to roll out half of it at a time) pretty thin line the bottoms of a greased muffin tin. Spoon in your leftover filling (any thick stew would work, as would anything that's not too runny).


 Cover the filling with another layer of dough, crimp the edges with a fork, and glaze with a bit of egg wash. Bake at 425F for about 15-20 minutes, or until the pie is slightly golden on top.


When you're splitting up the dough into the muffin cups, neatness is not very important. Just rip out a portion roughly large enough to go into the cup and stick out a over the sides. Same for the top. All that matters is you can crimp the edges to seal in the meaty goodness.

* Dog approved!

(Taken with a pie held over the camera. Don't feel bad, he got to eat it after.)

Storage/Leftovers
These will not be great re-heated, so only make the amount you plan to eat. Remaining uncooked dough can be frozen.

Wednesday, May 8, 2013

Fiddleheads!


too old!
So I was wandering around in the yard the other day looking for a big stick... as I do. And then out of the corner of my eye, I saw some ferns. Which reminded me, as I get reminded every year, that I have been planning on foraging for fiddleheads for the last five years. But every year, when I am reminded, I'm invariably reminded by the tall, unfurled, mostly full grown ferns that we see all summer, and not by the small, edible (nay, delicious!) young shoots.

That's the problem with fiddleheads. They aren't edible for longer than a few days, or at least that's how it seems to me. They start coming out in spring or even early summer, according to sources on the internet, but at least this year (maybe due to unseasonable heat? it's been near 80 for the last couple of weeks), most of the ones I've seen have already been mostly unfurled.

So I was really excited to see these little edible shoots. SO EXCITED.  

juuuuust right.
To make sure you're picking the right variety of fern, look at the stalk. If it curls inward like a celery stalk, you've got the right one. You can just rip them off -- the bottom bit of the stalk is a bit white, and people claim this part is woodier and not really tasty (I wouldn't know though) so I just ripped above that. When they're young, they'll snap pretty easily.

Before you go nuts, Wikipedia gives some sense that fiddleheads are full of healthy stuff but may also be harmful if ingested in great quantities:
Fiddleheads contain various vitamins and minerals, as well as omega-3 and omega-6 fatty acids. They are a source of antioxidants and dietary fibre.[2] They are low in sodium, but rich in potassium, which may make them suitable for people who need a low-sodium diet.[4]
Fiddleheads may harbour microbes, and should be washed and cooked before eating.[2]
Many ferns also contain the enzyme thiaminase, which breaks down thiamine. This can lead to beriberi and other vitamin B complex deficiencies if consumed to excess or if one's diet is lacking in these vitamins.[5]
Further, there is some evidence that certain varieties of fiddleheads, e.g. bracken (Pteridium genus), are carcinogenic. Ostrich fern (Matteuccia struthiopteris) is not thought to cause cancer,[6]although there is evidence it contains an as yet unidentified toxin.[7]
Though it seems like these types of fiddleheads (ostrich ferns) haven't been known to cause specific health issues, may as well play it safe and only eat a bit at a time.

So now that I've said that, let's move on to the cooking bit. Clean off any of the dried brown leafy bits that may be stuck to the fiddleheads and wash them thoroughly.


Step 1. Steam or boil for 10 minutes.
It seems to be generally accepted that whatever toxins may be in ostrich ferns, you can nullify their effect by steaming the ferns for 10 minutes first.

Step 2. Saute in butter and lemon.
Drizzle a bit of lemon on them and saute in a bit of butter for 2-3 minutes. Drizzle just a little more lemon on top and serve.

Serving suggestion.
Serve on a bed of quinoa with a side of pickled daikon (or whatever happens to be in the fridge when you're serving hungry people a late dinner). Fried egg on top is also delicious.


Monday, May 6, 2013

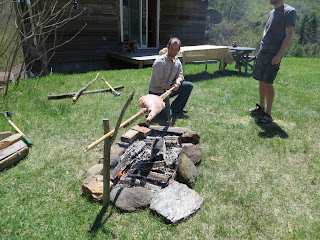
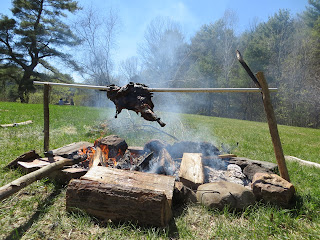
How to Spit-Roast a Lamb Using Household Items


  • Step 1. Buy a leg of lamb in the city. Put it in your backpack. Run to catch the bus while grotesque animal limb bounces up and down behind you because it's twice as tall as your backpack. Ignore curious looks. Ignore looks in the terminal. Ignore looks in the bus. Ignore looks at the bus stop at home. Bring leg home. Ignore dogs.
  • Step 2. Dig a hole for a firepit in your yard. Move the grass off in one piece so you can replace it later and tell your landlords you have no idea why a perfectly rectangular section of their yard is dead. 


  • Step 3. Build a fire pit after your town's fire warden tells you that it's too dry to safely light a bonfire, but if you're going to cook food on it, then it's okay. Lamb makes everything safer.
  • Step 4. Stick a couple of sharpened dowels through the meat. Ignore dogs. 


  • Step 5.  Start doubting yourself. Introduce structural supports. Use household items like twine and the base of a tiki torch. Bonus points if all your structural supports are flammable.
  • Step 6. Cooking time! Bring the meat to the fire. Ignore dogs.

  • Step 7.  Put the spit on vertical sticks (16" off the fire). Start turning the meat. And don't stop for 4 hours. You had nothing else planned for today, right?
  • Step 8. Introduce increasingly desperate reinforcements (e.g. nails, a clamp, a metal broomstick, more twine).

  • Step 9. Get cocky and decide to clear some dead brush while lamb cooks. Throw pine branches on the fire, getting the fire so hot that you set ablaze the twine with which you wrapped the lamb, and watch helplessly as the meat falls into the raging flames. Rescue the meat and admire the "fire-kissed crust." Pretend this was all part of the plan.

  • Step 10. Bring the lamb to the table. Ignore dogs. FEAST!