Friday, May 27, 2011

Avgolemono (Greek egg-lemon soup)

This soup is amazing. It's vegetarian, gluten-free, easy to make, and really refreshing on a hot day. You can vary the thickness with the milk and butter content -- I halved the milk and butter from the original recipe I had, and it was still thick enough for me.
  • Ingredients
  • 1 cup milk
  • 1 Tbsp. gluten-free flour (or cornstarch)
  • 6 egg yolks, beaten
  • 2 quarts chicken broth
  • 1/2 cup rice
  • 3-4 Tbsp butter
  • 1/4 cup chopped parsley (or more to taste)
  • 1/2 cup fresh lemon juice (or more to taste)
  • 1 grated lemon rind
  • salt and pepper

  • Directions
    Beat together milk, flour (optional -- if you want a thinner soup, omit the flour), and egg yolks in a bowl and set aside.

    Bring the broth to a boil in a medium/large pot and toss in the rice. Cook for 20-25 minutes. Add in the milk and egg mixture and cook for another minute or two on low heat. Remove from heat, add in parsley, lemon juice, lemon rind, butter, and season to taste.

    Saturday, May 21, 2011

    Moist Banana (or pumpkin!) Bread


    I have been meaning to post this recipe for a long time. It has never served me wrong! One day maybe I will remember to take a picture before eating the banana bread, but it's unlikely. :) Though now (October 2014) I've actually managed to take a photo of the pumpkin variation before eating it, so here it is:


    As a warning, start checking the bread after 45 minutes. Sometimes I need a full hour, but usually it's more like 50 minutes. On the other hand, be careful not to lose too much heat from the oven by checking too often, or it'll be dry by the time it's finally baked through. Once you've gotten to know your oven, just use your judgement!

    Ingredients
    3/4 to 1 cup brown sugar 
    1/2 cup butter, melted
    2 eggs
    1 teaspoon vanilla extract
    1/4 teaspoon baking powder
    1/2 teaspoon baking soda
    1 - 1.5 cups flour (depending on your preference)
    3-4 very ripe bananas, mashed - if using frozen, defrost fully beforehand 

    Preheat oven to 375F and grease a loaf pan. Blend together first four ingredients (mixing vigorously with a fork is fine). In a separate bowl, sift together the dry ingredients. Pour the dry ingredients into the wet ones and mix lightly (do not overmix). Fold in the bananas. Pour mixture into loaf pan and bake for 45-60 minutes.

    Variations
    1. Try adding 1/2 cup of chopped nuts and/or dried fruits.
    2. Make it gluten free: replace the 1.5 cups of flour with 1.5 cups of gluten free flour (as always, I recommend Gluten Free Mama's Almond Blend) and add about 1/2 teaspoon of xanthan gum. If you don't have xanthan gum, that's fine -- the bread will come out a little flatter and more dense, but no less delicious.
    3. Pumpkin bread! Replace the bananas with a can of (unsweetened, unflavored) pureed pumpkin.

    Wednesday, April 20, 2011

    Avocado Pile

    When I was a kid/teenager, my dad often made these "avocado sandwiches" for breakfast. They're more piles than sandwiches, but that's what I always called them growing up for some reason. He also added salmon caviar, which I don't have at my disposal anymore now that I live in a rural area with no Russian immigrants in it. He'd also frequently add in leftover salmon if he'd baked some the previous day, which is surprisingly delicious cold. The salmon adds a beautiful color to this recipe -- a talent that tinned sardines do not possess. Even so, if you can look past the drab appearance of the fish-in-a-tin that you found in the deserted end of the pantry, it makes for a shockingly delicious (and oh-so-nutritious!) meal.

    I'm completely guessing on these amounts, by the way. It doesn't make any difference how much you add of what, so just throw in ingredients until things look and taste right to you.

    [Makes two avocado piles.]

    Ingredients

    1 fresh, ripe avocado
    3-4 sardines/anchovies/some other salty fish
    1/4 cup feta cheese
    2 eggs, poached or medium-boiled (slightly runny yolks)
    freshly ground black pepper, to taste

    Directions
    Get your eggs cooking. If you're poaching the egg, just boil some water in a deep pan and crack the eggs carefully into it. Flip the egg over halfway through, and remove the egg just after the whites have been cooked. If you don't mind running egg whites, which I find gross, then you can remove them even earlier! If boiling, put the eggs in cold water and cook over medium heat. After the water has been boiling for just under 2 minutes (though the exact amount depends on how much water you used -- the more water, the faster the egg cooks), pour the water out and run the eggs under cold water; peel.

    Meanwhile, cut avocado in half and remove the pit. (The best way to do that is to give it one firm chop with a sharp knife and then gently rotate the pit. It should come out easily as you pull the knife away.) Carefully slice up the scrumptious green meat into cubes


    Using a fork, scoop the avocado out into a bowl, but reserve the shells for serving. Crumble up the feta and add it to the bowl, along with the fish. Grind in pepper (and whatever other seasoning floats your boat) to taste. Chop up the (hopefully slightly runny) egg and toss it on. Serve inside the avocado shells.

    Variation
    : Try the original -- replace the canned fish with salmon, either smoked or leftover from whatever method of preparation you prefer (baked, fried, grilled...). In this variation, remember to squeeze some lemon juice in the mix.

    Saturday, April 16, 2011

    African Nut-Butter Stew

    This is a recipe that is found, in one form or another, in a number of West African cultures. The traditional dish is a stew primarily with tomatoes and ground nuts. This particular incarnation probably deviates somewhat from tradition, but it sure is tasty.

    Also included here is a recipe for 10-minute vegetable broth. Highly convenient if you don't have any stock around the house. Chicken broth would work here, too, and I've seen this soup prepared with chicken (or other meat, like mutton or lamb) as well.


    [Probably enough for at least 6 servings, but who knows.]
    Ingredients

    1 small onion
    1 large red pepper
    3-4 cloves garlic
    1 (14 oz) can diced tomatoes (do not drain them!)
    6 cups vegetable broth (see 10 minute broth recipe below)
    1/3 cup uncooked rice
    ~1 cup unsweetened nut butter (I used almond)

    Directions
    To make vegetable broth: Chop up 1-2 carrots, 2 celery stalks, 1-2 onions, and 1-2 garlic cloves, or run them through the food processor until they're coarsely processed/grated. Heat oil in a saucepan, throw everything in, and cook, covered, for about 5 minutes. Meanwhile, boil 6 cups of water. Pour water over the veggies and return to boiling, then reduce heat and simmer another 5 minutes. Now strain and you have vegetable broth.

    Finely chop up onion, pepper, and garlic. Heat oil in a dutch oven or saucepan. Throw in onions, pepper, and garlic for a few minutes, browning the onions a bit. Pour in tomatoes and broth and simmer for 10-15 minutes. Now add the rice and simmer until it is cooked through, another 20-30 minutes. Whisk in nut butter, return to simmer, and serve.

    Variation:
    Try adding peas to the soup. Wait until the very end to add them in. We've been storing the soup in the freezer, adding the peas to the portion we're reheating in the pot.

    Gluten Free Banana Chocolate Chip Muffins


    This recipe is adapted to gluten free from this one. Which means I didn't do anything very inventive besides lower the amount sweet stuff and put in the right amount of xanthan gum.

    Ingredients
    • 1 3/4 cups your favorite gluten free flour
    • 7/8 tsp. xanthan gum
    • 1/2 cup sugar
    • 1 tsp. baking powder
    • 1 tsp. baking soda
    • 1/2 teaspoon salt

    • 1 egg
    • 1/2 cup vegetable oil
    • 1/2 cup plain yogurt --> important for acidity (some people report good results when using milk, but I still think yogurt is important in this recipe)
    • 3/4 teaspoon vanilla extract
    • 1+ cup mashed ripe bananas
    • 1/2 cup semisweet chocolate chips
    Directions
    Preheat oven to 350F. Combine first six ingredients in a bowl. In a separate large bowl, combine the egg, oil, yogurt, and vanilla. Pour dry ingredients into wet ingredients and fold over until just combined -- there can still be dry bits of flour in it, and that's fine.

    Anyway, fold in the mashed bananas and chocolate chips. Grease muffin tins and fill each cup no more than 3/4 full (depending on how much of a muffin top you want to see in the finished product). Bake for 20-25 minutes. Cool for a little bit before removing from tins, and then transfer to a cooling rack.

    Fun fact: In general, you don't want to overmix muffins or you'll have a tunneling problem: dense muffins with a bunch of holes in them from the air bubbles. (i.e. Use the muffin method, and Alton Brown fans, you know what that means.) But tunneling is created by gluten, a protein composite you don't want to over-excite if you don't want your muffins tasting like bubble gum. Our flour had no gluten to begin with, though, so maybe the muffin method is not as important in gluten-free baking. Does anyone actually know if this is true?

    Wednesday, April 13, 2011

    Nutty Energy Bars

    This recipe came from River Cottage Every Day, unsurprisingly. I made a few adjustments on the basis of lacking ingredients or not liking certain things (e.g. using almond butter instead of peanut butter). In the end, I thought it was a little too sweet, so next time I would use maybe 1/3 cup of brown sugar and 2-3 tablespoons of honey. A suggested variation in the book is to use a mashed ripe banana in place of the nut butter, but I haven't tried that yet.

    As you can see, my attempt at these bars gave me an odd pattern -- I tossed the seeds over the top and the mixture started bubbling when it came to a boil in the oven, and evidently it came up over the sides. I think it's pretty neat -- plus the edge pieces have no seeds, for added variety.
    :)

    Ingredients

    1/2 cup butter
    1/3 cup raw, unsalted, unsweetened nut butter (I used almond butter)
    1/4 cup honey
    2/3 cup (packed) brown sugar
    little bit of lemon zest (grated)

    1 1/4 cups rolled oats
    1 cup mixed seeds
    1/2 cup raisins
    1/2 cup (or less) chocolate chips

    Directions
    Preheat oven to 325F. Melt first five ingredients in a saucepan over very low heat, stirring occasionally. Add in the oats, raisins, and about 3/4 of the seeds. Mix together.

    Grease an 8" baking dish and line with parchment paper (so that it's easy to remove the concoction after baking). Pour in "batter," smoothing it out on top. Scatter chocolate chips and remaining seeds on top.

    Variation: I added half of the chocolate chips directly into the saucepan to have a more chocolatey base.

    Bake for about 30 minutes. For me, the stuff came out pretty much liquid, which figures as there aren't a lot of solid (when heated) ingredients. Put it in the fridge until it cools completely -- it'll be pretty much rock hard by then. :) Store in the fridge, and eat at a little lower than room temperature so everything doesn't goo up in your hands.

    Monday, April 11, 2011

    Stuffed Tomatoes

    I was looking through a cookbook on Middle Eastern food for inspiration when I came across a recipe for Tunisian stuffed tomatoes. Those call for olives and capers, which I really dislike, as well as preserved lemons, which I don't have. So this is a departure from the Tunisian traditional, but we loved it. Try it with lemony potatoes for a light dinner. Or just make the stuffing part as a quick spiced-up version of a tuna salad for lunch/snack.

    Ingredients
    2-4 medium tomatoes, firm but ripe
    2 red peppers
    1 can tuna (chunk light -- not albacore!), drained
    1/4 cup parsley, chopped up, stems removed
    1-2 tsp. lemon zest, grated

    Directions
    Roast the peppers. This is the most fun part. If you have a preferred method for pepper-roasting, do that and skip to the next paragraph. I like to do it the Alton Brown way -- directly over a gas burner. Put the peppers (one per burner, if you're doing more than one at a time) directly on the metal grate above the burner and turn with tongs every couple of minutes until you get an even char on the skin. (You'll remove that part, so don't worry.) Then put the hot, charred pepper into a bowl and cover with a plate. Let it sit until it cools, about 15 or so minutes. This will steam the pepper inside its skin.

    Preheat the oven to about 350F. Combine all the other ingredients in a separate bowl. When the peppers are cooked through and cool enough to handle, peel off the skin. You should be able to do this easily with your fingers -- it'll come right off. Get all the charred bits off the pepper, and pull the pepper apart to reveal the seeds inside. Depending on how cooked through your peppers are, this may be messy. Get all of the seeds out, and then cut the peppers into thin strips (whatever size you want to eat inside the tomato).

    Now take your tomatoes and cut a small hole into the tops -- reserve the caps. Scoop out all the juice and seeds with a spoon. Now shove your tuna/pepper mix into the tomatoes, replace the caps, place them on a baking dish, and roast for about 20-30 minutes. The tomato should be soft but should still retain its form.

    Serve as a side dish or as a main course. Goes well with lemony roasted potatoes. If you have filling remaining, refrigerate and use for the next day's lunch box -- works well as a fresh tuna salad over a bed of baby spinach.

    Roasted Lemony Potatoes

    The idea for adding lemon slices to a baked dish came, unsurprisingly, from River Cottage Every Day. Turns out roasted lemons are delicious!

    The amounts in this recipe, as in most others suggested on this blog, are very approximate. It's all just about how much of a meal you want to have, whether you want leftovers, how lemony you want your potatoes to taste, etc. It's also approximate because I don't weigh or measure things when I toss them together, so this is just a guess. The good news is that it makes no difference whatsoever.

    [Serves 4-5 as a side dish.]
    Ingredients
    2-3 pounds potatoes
    1 lemon
    2-3 garlic cloves
    olive oil (not extra virgin)
    salt, pepper, herbs for seasoning
    fresh parsley

    Directions
    Preheat oven to 400F. Soak and wash potatoes, scrubbing off any ground-in dirt, but leaving skin in tact. Depending on the size of the potatoes you can leave them whole or halve/quarter them. I used golden potatoes and quartered them. Boil them for about 5 minutes, until they're still pretty firm but can be pierced with a fork. Pour into a colander of some sort and drain. Slice the lemon thickly, and maybe cut the slices in half if you like. Crush the garlic cloves but leave the skin in tact so as not to over-roast the garlic. Place the potatoes, lemon slices, and garlic in an ungreased baking dish. Season as you see fit (I used some garlicky salt and random herbs & spices -- some oregano, maybe thyme, and other stuff). Pour olive oil generously over the mixture and toss it around with your hands until everything's pretty mixed around.
    Bake until a golden brown crust starts to appear on the potatoes. At about 30 minutes I got too hungry to wait for the browning and I put the potatoes in the broiler for about 2-3 minutes, which did the trick. Remove from the oven and sprinkle with parsley and/or whatever other fresh herbs you like most.

    Energizing Breakfast Juice

    We have a new cookbook -- River Cottage Every Day. It's all about "rustic" recipes using local and in-season produce. OK, so maybe using bananas violates the local bit, but just try living in Vermont and getting local, in-season produce when there's still snow on the ground! Anyway, the recipe for this juice comes from that book, though I didn't have everything it called for and I increased the amount of parsley (his recipe also calls for using 1" fresh peeled ginger root and maybe something else I've forgotten).

    I'm not sure the parsley did anything when put through the juicer -- so next time I tried blending it with the banana instead of juicing it. This definitely gave it a stronger parsley taste. I like it either way.


    Ingredients

    1 apple
    1 pear
    1 carrot
    2 celery stalks
    4 sprigs parsley
    1 banana

    Directions
    Put everything but the banana in a juicer. Then blend the banana in separately. For a drink that's more of a smoothie, and extra nutrients, juice the carrot and celery stalks and then put everything in a blender.

    Wednesday, April 6, 2011

    Easy Bouillabaisse

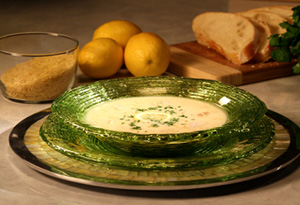
    This is one of those dishes that look so beautiful and taste so delicious that if you admit how simple the production was, your dinner guests will assume you're being falsely modest. So you may not want to ruin the illusion. ;)


    It may look like soup, but it always fills me up as a meal of its own. This stew is quite thick.

    Any flaky white fish will do. I've tried this recipe with cod, tilapia, halibut, hake, haddock, and catfish. Maybe my pallet isn't that developed, but I think it tastes great with all of the above, so which fish you want to use is up to you. This recipe is loosely based on this one that appeared in the New York Times, but a number of proportions (and some ingredients) have been altered.

    [Serves 3-4 people.]
    Ingredients

    1/2 cup olive oil (not extra virgin)
    2 tomatoes
    1 small onion
    1 carrot
    1 bay leaf
    2 handfuls of parsley
    3 cloves of garlic
    1/2 cup lemon juice
    2-4 fish fillets
    salt and pepper to taste
    1.5 cups broth
    1/2 cup white wine
    3/4 cup of bay scallops (optional)
    3 slices of white bread (I suggest sourdough)

    Directions
    Blanch tomatoes (i.e. place them in boiling water for about 5 seconds each, then run them under cold water), which will make it very easy to peel them. Peel, seed, and dice tomatoes. Thinly slice onion and carrot. In a (preferably cast-iron) dutch oven, heat oil until it's beginning to sizzle. Add the prepared tomatoes, onion, carrot, bay leaf, and one handful of parsley. Stir with a wooden spoon/spatula for a minute or two. Crush one clove of garlic and add it to the pan, and cook for about another minute.

    Place the fillets (if you want to have a thicker stew, add more fillets accordingly) in the dutch oven -- in one layer, or as close as you can get it. Add the lemon juice, salt, and pepper, and boil the fish for 10-15 minutes, flipping the fillets once halfway through.


    While the fish is cooking, prepare the bay scallops. This basically means rinse them under cold water, and then make very sure that they are dry -- pat them down carefully with paper towels until they're completely dry. Melt a tablespoon of butter on a (preferably cast-iron) skillet. Dice one of the garlic cloves and add it to the butter. Making sure that pan is very hot, throw on the scallops. Don't stir them around too much, so that they have a chance to brown nicely on every side. It's easy to overcook scallops, so about five minutes should do the trick. Remove scallops from heat and set aside.

    Back to the stew! You can use chicken broth if you want the stew to have a less fishy taste, or fish broth if you're going full-on. If I'm lazy and out of homemade stock, I just use one bullion cube and 1.5 cups of water. Add broth and wine to the stew. Simmer until the fish is just cooked through -- it'll be flaky and come apart easily.

    Meanwhile, toast the bread. Rub with butter and the third garlic clove and place on the bottom of the serving bowls.
    Toss remaining parsley into the dutch oven. Ladle over the toasts, and top with browned scallops. Eat immediately!

    Coconut Fudge Truffles


    The brigadeiros were a big hit -- but I feel like I'm going into a diabetic coma just eating one (or maybe two... or three). So we were thinking about how to make a slightly less sweet variety. The main idea was using evaporated milk instead of condensed milk and adding in sugar ourselves (condensed milk is about 4 parts evaporated milk to 5 parts sugar, which is crazy -- we wanted to try 2 parts evaporated milk to 1 part sugar and see how it went). Well, we got a little carried away... but the truffles turned out so delicious!

    So here it is -- a pretty crazy spin on Brazilian truffles.

    [Makes 30-35 candies.]
    Ingredients
    1 cup evaporated milk
    1/2 cup coconut milk
    1/2 cup sugar
    2 Tbsp. butter
    1/4 tsp. salt
    4 tsp. cocoa powder
    1 tsp. instant coffee
    2-3 Tbsp. tasty flour

    Directions
    Bring the first seven ingredients to a rapid boil over medium heat. Lower heat and simmer mixture, stirring occasionally to keep it from sticking. If it still seems too liquid after about 10 minutes, add in a bit of the flour. It took us about 20-25 minutes of simmering to decide to add in flour, after which point the mixture still didn't seem thick enough, but we took a chance and put it in the fridge. It came out fine. Keep it in the fridge until it's completely cold (we just left it overnight because we got tired, but an hour or two should do the trick).

    Meanwhile, chop up nuts, toast some coconut flakes, and prepare whatever other toppings you want to use. This time, I used pistachios, hazelnuts, almonds, and toasted coconut. Take 1 teaspoon at a time of the fudge and roll into a ball over the topping(s) of your choice -- if the topping is some kind of nut, try putting a whole one in the middle. Place the candies on parchment or wax paper. If storing or giving as gifts, try wrapping them in wax paper (as shown here).


    Tip: Get your hands wet with warm water -- this will keep the fudge from sticking to your hands while you're trying to roll it. Wash your hands after every four or five truffles you roll, or whenever they start to get dirty -- if the chocolate mixture starts to accumulate on your hands, the truffles will stick more, creating a frustrating mess.

    Variation: Try dipping them in chocolate.

    How to make dipping chocolate

    This might seem silly, because chocolate is an easy thing to melt. And in the technical sense, I agree -- it's easy to turn solid chocolate into liquid chocolate. But depending on your intended use, you can use the melting process to bring out all the delicious hidden flavors lurking behind that rich chocolatey goodness...

    Whether you're dipping strawberries, truffles, biscotti, or just your fingers, the basics for making good dipping chocolate are:
    1. Chocolate, and
    2. Butter
    Some recipes call for using shortening instead of butter, but I haven't seen any advantage to doing so. I prefer butter because it's something I always have on hand, whereas shortening might require a trek so deep into the back of the pantry that I may never find my way out again. So here's what you do:
    Use about a tablespoon of butter for every half cup of chocolate. Melt everything in a double boiler, stirring occasionally with a wooden spoon. [By the way, a double boiler is a bona fide uni-tasker. You don't need to go out and buy a double boiler -- just take a metal mixing bowl or any small saucepan, put it on top of a bigger saucepan which has some water in it, and bring the water to a boil. Then put all whatever you're melting into the mixing bowl or small saucepan on top.]
    1. Chocolate-dipped fruit
      If you're making chocolate-dipped strawberries or whatever other fruit has caught your fancy (have you tried chocolate-dipped prunes? no, seriously -- apparently that's a thing that some people love), you probably want to keep the dipping chocolate as simple as possible. For this, just butter and chocolate will do.

    2. Dipping something nutty
      Maybe you're trying to add a chocolate layer to some biscotti, or maybe you're dipping truffles. Maybe you're just dipping nuts themselves for a quick & easy but still somewhat decadent dessert. Either way, the chocolate can be much richer this way. Exciting! So here are the ingredients for melting in the double boiler.
    1/2 cup dark chocolate*
    1/2 tsp. instant coffee
    1-2 Tbsp. butter
    pinch of salt

    * Sometimes I use unsweetened baking chocolate and sometimes a dark chocolate bar, whichever is on hand. Taste the chocolate mixture when it melts and add sweetener and whatever else until it suits you.
    Cleaning tip
    When everything in sight is chocolate-dipped and you have produced delicious dessert to your heart's content, you might notice the gross sticky mess you've created in your double boiler. Scrape off any remaining bits of chocolate from the bottom of the bowl (though why would there be any chocolate left?!) and fill dirty bowl with water. Heat up the water (may as well use the saucepan/mixing bowl as a double boiler again), which will liquefy the left-over chocolate gunk and make it much easier to clean up.

    Tuesday, April 5, 2011

    Biscotti

    This biscotti is relatively soft, compared to the more traditional rock-hard biscotti. The recipe came about when I was helping Sanya come up with potential products to sell at Tazi's Cafe. This is a compilation of my favorite parts of several different recipes I considered. It's easy to customize this recipe (see variations below for some ideas). I've tried it with almonds & cranberries, hazelnuts & chocolate chips, and pecans (the last one being my least favorite). I've tried melting chocolate into the dough to make chocolate and almond biscotti. That turned out well, but I prefer using chocolate chips instead of melting the chocolate and ending up with a dark brown biscotti. I've also tried making this recipe with whole wheat flour, which I liked less than using all-purpose flour -- the taste/texture of the flour didn't seem to fit with the cookie. Point being, there are plenty of ways you can customize this recipe. Try playing around with the ingredients, and let us know if you come up with anything delicious!

    [Makes about 18 biscotti.]
    Ingredients
    1/2 cup butter
    1/2 cup sugar
    2 eggs
    1/2 tsp. vanilla
    2 1/4 cups flour
    1/2 tsp. cinnamon
    1/8 tsp. cardamom
    1/8 tsp. nutmeg
    1 tsp. baking powder
    1/4 tsp. salt
    1 cup almonds
    2/3 cup cranberries

    Directions
    Preheat oven to 350F.

    Melt the butter so that it is soft but not too warm. Using an electric mixer, beat together butter, sugar, and eggs. Beat in flour. If using a hand mixer, the mixture may get too dry for the mixer to handle, in which case mix the rest with a fork. Add in spices, baking powder, salt and mix in.
    Fold in nuts and cranberries. The dough should be pretty firm at this point, and should not stick to your hands.

    Dump out dough onto a silicone- or parchment-lined baking sheet. Shape dough into a long log, flattening out the top so that the log is about 2" wide and 1/2" thick, and even throughout.
    Bake for 30 minutes at 350F. Turn down oven to 325F. Remove from oven and slice into individual biscotti and turn cut-side up on the baking sheet. Bake for 10 minutes at 325F. Then flip biscotti so that the other cut-side faces up and bake for another 10 minutes.

    Remove from oven, allow to cool, and enjoy.

    Variations:
    1. Hazelnut & Chocolate Chips
      Don't add any vanilla, and substitute 1 cup roasted hazelnuts for the almonds and 1/2 cup of chocolate chips for the cranberries.
    2. Almond extract
      If making the almond variety, try using 1-2 teaspoons of almond extract in addition to, or perhaps instead of the vanilla for a stronger almond taste.
    3. Chocolate biscotti
      Melt a few semisweet chocolate squares with the butter.
    4. Chocolate-dipped biscotti
      Melt together 1/2 cup dark chocolate, 1/2 tsp. instant coffee, 2 Tbsp. butter, and a pinch of salt in a double boiler. Dip bottoms of baked biscotti directly into chocolate. Place chocolate side down on parchment paper and let the chocolate harden to room temperature (or chill in fridge).


    Sunday, March 27, 2011

    Chocolate Truffles - Brazilian style

    I read about brigadeiros somewhere on Smitten Kitchen a little while ago and have been wanting to try them. Her recipe is more "advanced" than I felt up for tonight. Not really, but it involves coconut milk and a longer cooking time than I was willing to commit to. So I decided to stick with the basics: cocoa powder, condensed milk, and butter. That's it. At least until I decided to roll them in stuff after being inspired by their Wikipedia page. ;)

    [Makes about 20 brigadeiros.]
    Ingredients
    3-4 Tbsp (unsweetened) cocoa powder
    1 (14 oz) can sweetened condensed milk
    1 Tbsp butter

    Directions
    Heat ingredients together in a saucepan over low heat, stirring constantly, until the mixture thickens. Chill in the fridge or freezer until the mixture is pretty firm -- malleable, but not too sticky.

    Meanwhile, chop up some things to roll the candies in. I chopped up some hazelnuts, white chocolate chips, semisweet chocolate chips, and peanut butter chips. If I'd had some coconut flakes, I'd have tried that too!

    Spread each topping in an even layer on a cutting board. When the mixture is sufficiently chilled, roll into balls with your hands (about 1-2 teaspoons' worth for each candy) and roll the balls in the desired toppings.

    I think they taste delicious at room temperature, but keep them in the fridge until you're ready to eat them.

    Storage idea
    Wrap truffles individually in wax paper. I cut the wax paper into strips, rolled each strip over a truffle so that it formed a cylinder, and twisted the ends.


    Variations:
    1) Put a whole nut (e.g. hazelnut) into a truffle with the same topping.

    2) If you like Lindor truffles, try dipping the brigadeiros in melted chocolate after doing the procedure described above and let the truffles cool. You'll end up with a hard(er) chocolate shell and soft truffle inside.

    Quinoa Tabbouleh

    This was my first experience making tabbouleh, and it came out great. I don't usually love tabbouleh, and I think using quinoa instead of the more traditional bulgur wheat is what makes this salad better than the usual, at least for my taste buds. This accompanied Asa's falafel, which was amazing.


    [Serves 4-5 people.]

    Ingredients
    2 Tbsps oil
    1-2 tsps ground cumin
    1-2 tsps ground coriander
    1 cup quinoa (I used red quinoa)
    2 cups broth (or 2 cups water + 1 bouillon cube)

    1 large carrot, grated
    1-2 handfuls parsley, chopped
    1 large cucumber, diced
    2-3 tomatoes, diced
    1 green onion, chopped fine
    1/4 cup extra virgin olive oil
    1/4 cup lemon juice

    Directions
    Heat oil in a cast iron skillet. When oil is very hot, toss in cumin and coriander and stir rapidly with a wooden spoon until the spices are dissolved into the oil. Toss on (thoroughly rinsed) quinoa and roast for 4-5 minutes.

    Meanwhile, dissolve bouillon cube in the water (or set broth to boil) in a saucepan. Add in quinoa, cover, and simmer for about 15 minutes, until all the water is absorbed into the quinoa. Put the quinoa into the fridge to let it cool.

    Meanwhile, combine all the other ingredients in a salad bowl. Throw in cooled quinoa. Toss together and serve.

    Falafel - Second Attempt

    I tried making falafel for Matt and Anna the other night. The first attempt didn't go so well; the first few patties went in whole but never came out. They didn't stay together and just degenerated into a chickpea crumble at the bottom of the pan. Fortunately Matt was around and suggested adding more flour to the mixture, which saved the day. I was able to cook two batches successfully before the oil turned to chickpea sludge and we had to stop due to health code violations.


    I tried following Alton Brown's recipe:
    1 pound dried chickpeas, sorted and rinsed
    1 teaspoon whole cumin seed
    1 teaspoon whole coriander seed
    2 cloves garlic, coarsely chopped
    4 small scallions, trimmed and finely chopped
    2 teaspoons kosher salt
    1/2 teaspoon freshly ground black pepper
    1 teaspoon aluminum-free baking powder
    1/2 teaspoon cayenne pepper
    2 tablespoons chopped fresh parsley leaves
    2 quarts peanut oil
    Pita bread, warmed, for serving
    I made a few adjustments: I used 3 cans of chickpeas instead of soaking my own pound. I used soybean oil instead of peanut oil and finally I added about a cup of fava bean flour to dry out the mixture. I just kept adding the flour until the mixture had the texture of cookie dough and then fried 'em up!


    To actually make the mix you just put the oil in a pot with tall sides (to avoid spill over of hot oil; I learned that this is pretty important) and heat it to 350 degrees. In the meantime put all the other ingredients other than the flour in a food processor and pulse until there are no more whole chickpeas. Add in the flour, mix with your hands, and form into the shapes you want to fry! I made patties that were about an inch and a half in diameter. Then to cook just put gently in the oil and cook until golden brown. For me this took about 7-8 minutes.


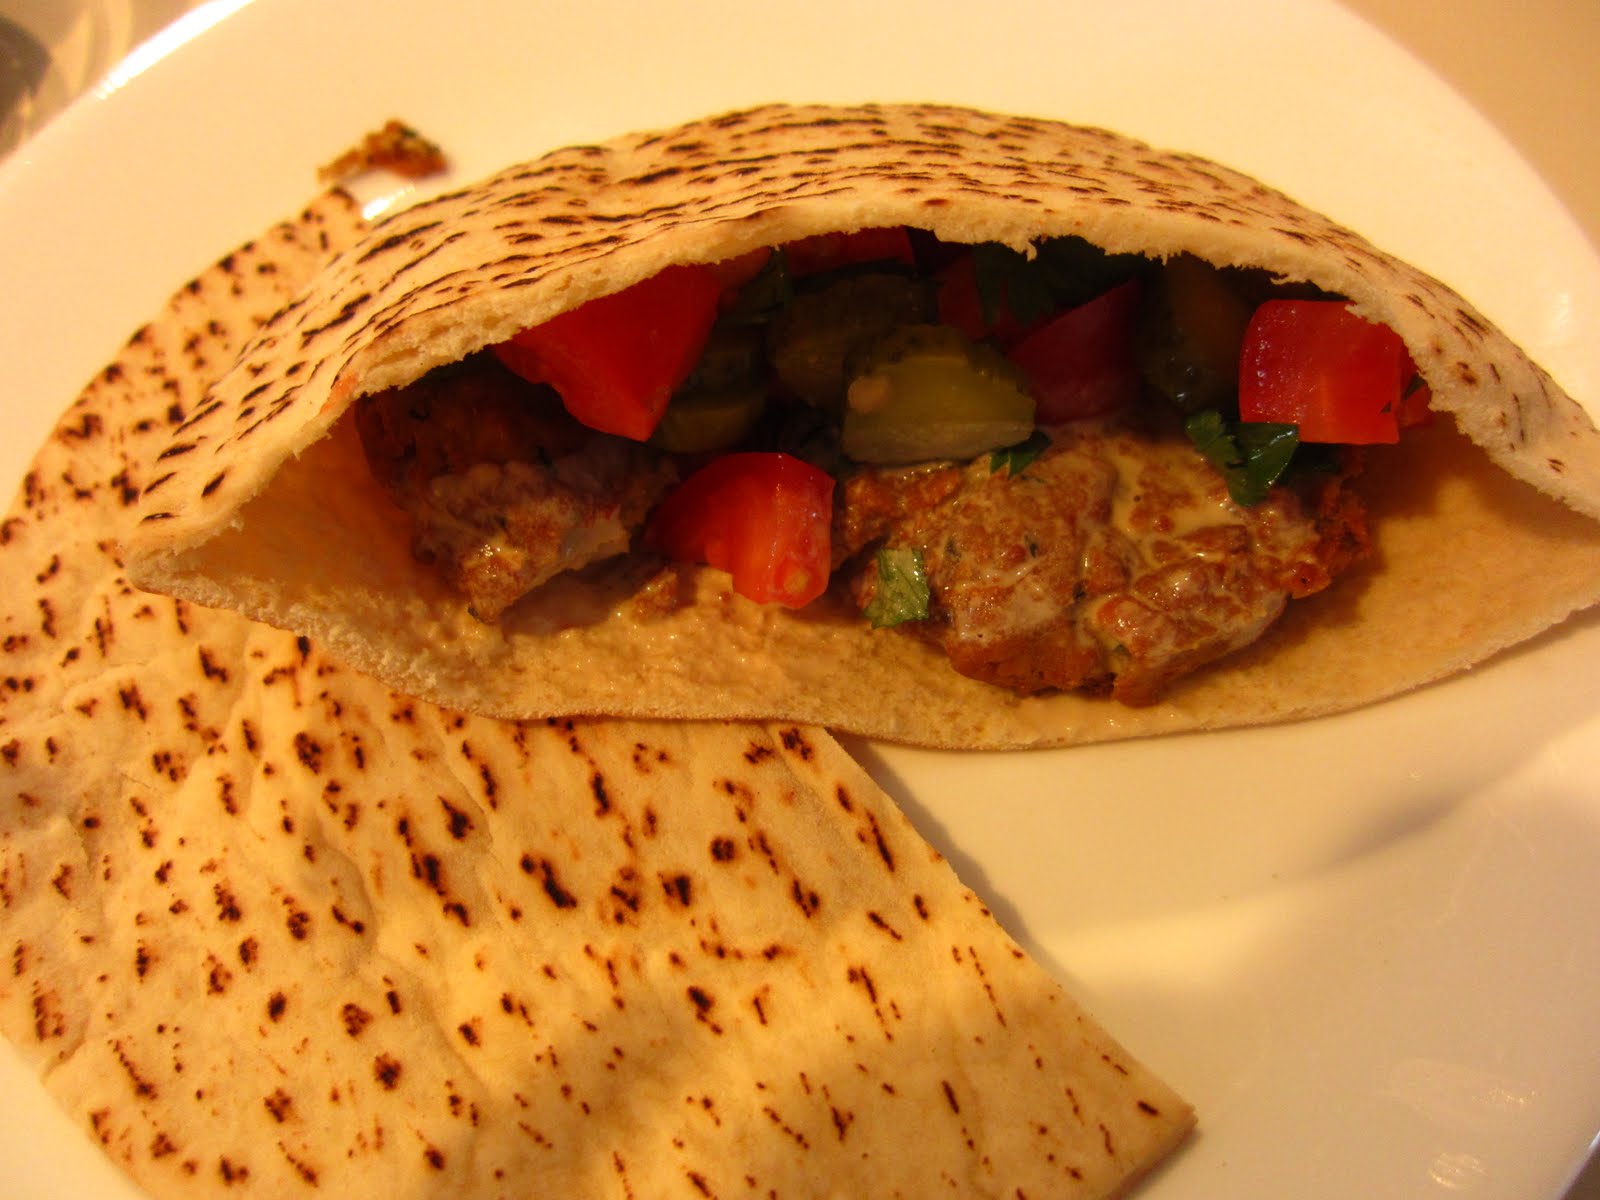
    For sides and dressing I cut up some cucumbers and tomatoes, added some parsley, and put that in one bowl. In another I put chopped pickles, in another yogurt mixed with chopped parsley and finally one with tahini mixed with lemon juice.To make a falafel I took a pita, put in some cooked falafel and then add pickles (a must!), some tomato/cukes and either tahini sauce or yogurt sauce. They turned out pretty good and were really easy to make :)

    Saturday, March 26, 2011

    Shortbread

    This has to be one of the quickest, easiest, and simplest home-made desserts possible. With a grand total of four ingredients and clocking in at just 30-35 minutes including prep and bake time, this recipe is a ridiculously easy way to get fat. But hey, if you're looking for comfort food, you just have to bite the bullet and jog the next day to make up for it. (Given that there are apparently 1628 calories in 1 cup of butter... that's a lot of jogging.)

    So that's the bad news. The good news is that calorie-counting is a load of nonsense anyway, and these cookies are delicious. :) Here's the recipe that I use, adapted from Joy of Cooking.


    Ingredients
    1 cup (two sticks) butter
    2 cups flour
    1/2 cup powdered sugar
    1/4 tsp salt

    Directions
    Preheat oven to 325F. In a medium bowl, soften butter in microwave -- it should be decisively warmer than room temperature, and starting to melt & liquefy a bit. Either using a whisk or a hand mixer, cream the butter (i.e. mix it up really fast until it looks like really thick cream). Sift together flour, sugar, and salt, pour onto creamed butter. Mix until everything blends together, at which point you'll have what appears to be a rather crumbly dough. Pat the dough into a square baking dish. If all went well, then once you pat it down it should have the texture of a slightly wet shortbread cookie. It'll look something like this.


    Push down the edges of the shortbread with a fork. (This is purely for decorative reasons.) Now poke the dough evenly with the fork, so you have holes spaced an inch or so apart. Bake for about 30 minutes on the top rack, or until the crimped edges are starting to brown a little. The middle of the shortbread will still be pretty white, but that doesn't mean it's not ready. Remove from oven, let cool for about 10 minutes, and then cut it up into cookies of the desired shape and size.

    Especially tasty with some black tea. :)

    Thursday, March 24, 2011

    Custard Fruit Tart w/ Graham Cracker Crust


    I was trying to come up with a nice culinary surprise last night for Asa while he was at his soccer game, and realized that custard is a double whammy -- he loves it, and I've never tried making it before! So I looked up a bunch of different recipes, took the elements of each that seemed nicest, and hacked something together that actually turned out quite delicious, and extremely easy.

    Graham cracker crust: I roughly used this recipe, but had to change around the proportions a bit and add a little extra flavor. I made enough to fill one round 8" cake pan and a small heart-shaped pie tin (see photo), so a little more than if you're just making one pie.
    Ingredients
    2.5 cups crushed graham crackers (I used "honey graham crackers" to good effect)
    ~3/8 cup sugar
    10 Tbsp. melted butter
    3/4 tsp. cinnamon
    1/8 tsp. nutmeg (optional)
    1/8 tsp. allspice (optional)

    Directions (Graham cracker crust)
    Preheat oven to 375F. Crumble up graham crackers in a bowl. I mostly did this by crushing them between my fingers, and then used the back of a large wooden spoon to mush them up more finely. It's OK if it isn't all a fine powder by the end, so long as there are no large pieces.

    Add in sugar, butter, and spices. Blend together until the mixture has an even consistency throughout. Spread evenly in the cake pan (no need to grease it beforehand). I did this slowly, patting the mixture down firmly with my fingers, in order to get it to be spread evenly. Make sure you have enough to go up the sides of the cake pan, as well.

    Bake on top rack of oven for 5-6 minutes. Remove and let it cook for a while. After it was no longer scalding hot, I relocated the tins to the fridge so that they'd be chillin' while I made the custard.
    Custard: This turned out to be pretty easy! I forget which recipe I used most heavily of the ones I found online, but I make no claims to having completely invented this one:
    Ingredients (Custard)
    2 egg yolks
    1/4 cup sugar
    1/4 cup flour
    1/2 tsp vanilla
    1 cup milk

    Directions (Custard)
    To separate yolks from whites: crack egg over a cup, and pour yolks from one half of the shell to the other, letting the whites (clear goop at this point) pour down into the cup. When most of it is off the yolk, throw the yolk into a bowl. Repeat with the other egg.

    Whisk together yolks, sugar, flour until the mixture has an even consistency. (1/4 cup sugar makes a pretty sweet custard. If you want it to be less sweet, vary sugar amount accordingly.) It's going to look kind of dry at this point, but that's alright.

    Now heat up milk in a saucepan until it's too hot for you to comfortably hold your finger in it for more than a second or two. Slowly pour it in to the mixture while whisking together. At this point it's like thick milk with clumps in it.

    Pour mixture into saucepan and add vanilla. Stir it slowly while heating over low heat. After 2-3 minutes, it should start getting pretty solid. When it's the consistency you like, take it off the heat.

    Spoon the custard onto your pie crust(s), and smooth out the top with a spatula. Place a sheet of plastic wrap directly onto the surface of the custard, and pat it down a little bit so that it's firmly on there. (The point of this is to keep a gross film from forming.) Return the filled pie crust(s) to the fridge at this point to give the custard a chance to cool down.

    To top it off nicely, chop up whatever fruits you want for a topping (kiwis and strawberries make for a beautiful tart -- sadly I had no strawberries this time). Heat up some light-colored jam (I used apricot) over low heat, stirring it to keep it from sticking to the bottom of the saucepan and burning, until it's pretty liquid. Remove the tarts from your fridge, take off the plastic wrap, and place your fruits on top of the tart (it looks nicest, I think, if they're all in one layer, but that's up to you). Brush the liquified jam over the tart evenly, and chill the tart. If you want to eat it right away, just stick it in the freezer for a couple of minutes and the jam will cool down right away.

    EAT!
    It was late, so we didn't attack the big one, which stayed in the fridge with plastic wrap on the custard. I like having a lot of custard in my fruit tarts, so the next day I added another layer of custard to the big fruit tart, this time with no vanilla to cut down on the vanilla taste.

    Simple Fried Rice

    The beauty of fried rice is that it doesn't have to answer to any standard or higher authority - nobody can tell you that it's done wrong. Technically you also need no recipe for it, but a starting point always helps.

    This is a quick way of making this dish that works well for me, in part because it calls for "exactly what's in my fridge", which is often ... not much.

    You can add anything you want to it and see how it comes out. It also tastes great by itself, courtesy of a few spices.


    So, here's the scrounging plan:

    Basics

    • Some Cooked Rice.
      Any rice would do if you're OK eating it. I use white Basmati (0.5 cup rice + 1.5 cups water, simmered covered until absorbed). I usually throw a little Ghee in it.
    • 1 Onion (large or a couple small)
      Diced, chopped, or cut into rose petals if that's what you like.
    • Shortening of choice (butter, ghee, etc).
      I use ghee when I can, and coconut oil is quite good too.

    Optional but helpful:

    • 1 Potato (large or a couple small)
      Chopped really small. I use one of these to chop this and the onion in seconds.
    • 1 Egg
    • Random Vegetables (eg peas, edamame, corn, beans, scallions, etc) - whatever you have. The only concern with these is that they can add too much water, especially if they are frozen - drain or dry them a little, or just cook everything a little longer.
    • Meat, Tofu, etc can also be added
    • Spices:
      • Salt
      • Pepper (fresh ground ideally)
      • Turmeric
      • Cumin

    Execution Plan

    1. Cook the rice - that will probably take 10-15 minutes so you'll have time to do everything else
    2. Heat some spices in the butter/ghee on a large pan. I grind pepper and throw in cumin and turmeric to taste. (More cumin than turmeric, ideally).
    3. Chop the potato and add to frying pan, fry on medium-high heat, turning nearly constantly. 3-5 minutes should be plenty - it'll start to look a little like hash-browns.
    4. Add salt and maybe more spices!
    5. Chop the onion and add to potato, fry a bit more.
    6. If using other veggies, you can add them now or later.
    7. Rice should be ready by now, toss it in and fry some more, turning constantly.
    8. When you feel that things are about done, crack an egg into the mixture and toss feverishly so it is evenly combined into the mix. The egg will cook in seconds, and you're done.