I love puff pastry, and it makes a lot of baking projects more delicious and glorious. But most people view it either as something to be purchased from an expensive store, or something that takes monumental effort and talent. This recipe, adapted from River Cottage Every Day, proves that to be wrong! This takes about 15 minutes to prepare, and then rests for (at least) 30 minutes, giving you easy puff pastry dough in well under an hour. Pretty awesome. Use this dough for french fruit tarts (entry forthcoming), pasties (where this recipe first appeared on this blog), as a pot pie topper, or any of a thousand other excellent ideas.
Puff pastry
2 cups flour
1 teaspoon salt
2/3 cup butter, chilled and chopped into small cubes
ice water
Procedure
Sift the flour and salt together in a large bowl. Throw in the cold chopped up butter and toss until all the butter chunks are covered with flour. You can use a pastry cutter if you want, but if you do, make sure you don't over-chop the butter. This is important if you want that delicious flakiness in the pastry! The butter cubes shouldn't be smaller than 1 cubic cm (not that I measured). Definitely don't use a food processor---I've made that mistake.
Add the water a couple of tablespoons at a time, mixing it in with a wooden spoon, until you have just enough liquid to make a firm dough. The butter is still in chunks at this point.
Shape the dough roughly into a rectangular prism with your hands and put it on a well-floured surface. Flour a rolling pin and roll the dough out in just one direction (away from you is easiest) until it makes a long, flat rectangle -- about 1/4" thick. Fold the top third down and the bottom third up over that (like a letter) so that you have a rectangle that's three layers thick. Rotate 90 degrees and repeat the process. Roll out, fold, and rotate a total of six times. Then cover the dough with plastic wrap and put it in the fridge to rest for at least 30 minutes. You can also freeze it, and it should keep for a good long while.
Showing posts with label general advice. Show all posts
Showing posts with label general advice. Show all posts
Sunday, January 25, 2015


Friday, January 16, 2015
Pork chops and fried egg brunch
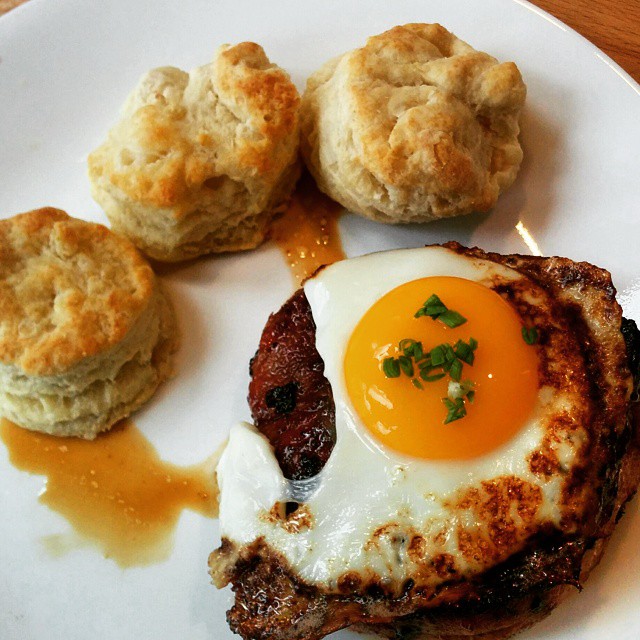
Crucial Rule #1 when it comes to doing just about anything with a pork chop: make sure that you get the thickest possible cut of pork chop! Just about all of us pig-eaters have at some point encountered the jaw-straining treachery of the overcooked skinny pork chop, and it gives a bad name to this potentially delicious cut of meaty goodness. Crucial Rule #2---and this applies to most meats you'll want to cook---is that you should have a meat thermometer. If you get a nice, chunky pork chop and cook it to 145F, there's almost no way you can go wrong. I mean, seriously, a pork chop is gonna be delicious with no marinade, rub, or glaze at all. It's that good.
That said, here's a recipe for a brunchy pork chop presentation that does involve a (super quick and easy) rub/glaze, largely inspired by this recipe.
Ingredients [for 2 pork chops]
2 Tablespoons brown sugar
2 teaspoons paprika
1 teaspoon salt
1/2 teaspoon black pepper
2 Tablespoons butter
2 thick-cut pork chops
3 Tablespoons bourbon*
2 eggs
2 teaspoons chives or scallions or garlic scapes
Procedure
Heat the butter on a (preferably cast-iron) skillet over medium heat. Mix brown sugar, paprika, salt, and pepper together. Rub the mixture onto the pork chops, making sure to get the whole surface. When the butter has melted completely, throw the pork chops on to the skillet. Lower heat to medium-low. Cook for about 5 minutes on the first side. Flip the pork chops, and then pour the bourbon. Cook for another 5 minutes. If your pork chop is really thick, the internal temperature is probably only around 100F by this point. If this is the case for you, finish the rest of the cooking in the oven: put the pork chops onto a foil-lined baking sheet, pour any glaze remaining in the pan on top, and bake at 400F until the internal temperature of the pork chops reaches the desired 145F. Transfer the pork chops to a warm plate when they're ready.
Meanwhile, fry up a couple of eggs (letting the whites cook through but leaving the yolks runny). Mince up the garlic scapes (or whatever green thing you're using). Put the eggs on top of the pork chops, and sprinkle the green stuff on top of the eggs. Serve with some delicious biscuits!
* When I was making this recipe this morning, a disaster occurred, in which I grabbed what I thought was a little Christmas-stocking-stuffer-size bottle of bourbon, only to discover it was a Christmas-stocking-stuffer-size bottle of bourbon maple syrup. I was saved only by the fact that it is humanly impossible to screw up a pork chop and literally any delicious thing tastes good on it.
Saturday, March 22, 2014
Easy fridge pickles

This recipe works for just about any vegetable that you have going to waste in the back of the refrigerator. We did it with baby red peppers and string beans, and they turned out really delicious. We'll definitely be doing this with other veggies in the future, too!
Ingredients
[Makes enough to fill 3 quart-sized Ball jars]
~ 3 lbs. string beans, peppers, and/or whatever other veggies you want to pickle
3 cups vinegar
3 cups water
4.5 Tbsp. pickling salt
6 cloves garlic
6 Tbsp. dill seed

Procedure
Clean the jars in boiling water to disinfect. Put the garlic and fennel seeds into the bottoms of the jars.

To make the brine, combine the vinegar, water, and salt in a large pot until the mix comes to a roiling boil. While that's heating, put the veggies into the jars on top of the spices. Try to pack them in pretty tight. You may need to trim the beans if you're using pint jars or the veggies are particularly long, but I didn't find this to be an issue in the quart jars.
Pour the brine over the veggies, leaving about a 1/2 inch at the top. Stir a little bit to remove any air bubbles, put on the lids, and stick the pickles in the fridge for about a week (for full flavor). That's it!

Storage
These will last for a while (at least several weeks) in the fridge.
If you've canned stuff (like jam, or "real" pickles, or tomatoes) in your life, you probably know that there are more particular steps to be followed. One thing that's so great about this recipe is how easy it is, because the pickles last for a long enough time in the refrigerator to render serious canning unnecessary. But if you do decide to can them, this recipe will still be perfectly fine---you're just on your own for the canning procedure. This is what happened when we tried to do it:

And no. This is not our first attempt at canning. Maybe some people just aren't meant to be able to make pickles that can be stored indefinitely at room temperature.
Variations
You can add red chili flakes for a bit of a kick, but as our household average spice-wussiness level is quite high, we haven't tried.
Wednesday, May 8, 2013
Fiddleheads!

 |
| too old! |
That's the problem with fiddleheads. They aren't edible for longer than a few days, or at least that's how it seems to me. They start coming out in spring or even early summer, according to sources on the internet, but at least this year (maybe due to unseasonable heat? it's been near 80 for the last couple of weeks), most of the ones I've seen have already been mostly unfurled.
So I was really excited to see these little edible shoots. SO EXCITED.


 |
| juuuuust right. |
Before you go nuts, Wikipedia gives some sense that fiddleheads are full of healthy stuff but may also be harmful if ingested in great quantities:
Though it seems like these types of fiddleheads (ostrich ferns) haven't been known to cause specific health issues, may as well play it safe and only eat a bit at a time.Fiddleheads contain various vitamins and minerals, as well as omega-3 and omega-6 fatty acids. They are a source of antioxidants and dietary fibre.[2] They are low in sodium, but rich in potassium, which may make them suitable for people who need a low-sodium diet.[4]Fiddleheads may harbour microbes, and should be washed and cooked before eating.[2]Many ferns also contain the enzyme thiaminase, which breaks down thiamine. This can lead to beriberi and other vitamin B complex deficiencies if consumed to excess or if one's diet is lacking in these vitamins.[5]Further, there is some evidence that certain varieties of fiddleheads, e.g. bracken (Pteridium genus), are carcinogenic. Ostrich fern (Matteuccia struthiopteris) is not thought to cause cancer,[6]although there is evidence it contains an as yet unidentified toxin.[7]
So now that I've said that, let's move on to the cooking bit. Clean off any of the dried brown leafy bits that may be stuck to the fiddleheads and wash them thoroughly.

Step 1. Steam or boil for 10 minutes.
It seems to be generally accepted that whatever toxins may be in ostrich ferns, you can nullify their effect by steaming the ferns for 10 minutes first.
Step 2. Saute in butter and lemon.
Drizzle a bit of lemon on them and saute in a bit of butter for 2-3 minutes. Drizzle just a little more lemon on top and serve.
Serving suggestion.
Serve on a bed of quinoa with a side of pickled daikon (or whatever happens to be in the fridge when you're serving hungry people a late dinner). Fried egg on top is also delicious.


Monday, May 6, 2013
How to Spit-Roast a Lamb Using Household Items

- Step 1. Buy a leg of lamb in the city. Put it in your backpack. Run to catch the bus while grotesque animal limb bounces up and down behind you because it's twice as tall as your backpack. Ignore curious looks. Ignore looks in the terminal. Ignore looks in the bus. Ignore looks at the bus stop at home. Bring leg home. Ignore dogs.
- Step 2. Dig a hole for a firepit in your yard. Move the grass off in one piece so you can replace it later and tell your landlords you have no idea why a perfectly rectangular section of their yard is dead.


- Step 3. Build a fire pit after your town's fire warden tells you that it's too dry to safely light a bonfire, but if you're going to cook food on it, then it's okay. Lamb makes everything safer.
- Step 4. Stick a couple of sharpened dowels through the meat. Ignore dogs.

- Step 5. Start doubting yourself. Introduce structural supports. Use household items like twine and the base of a tiki torch. Bonus points if all your structural supports are flammable.
- Step 6. Cooking time! Bring the meat to the fire. Ignore dogs.

- Step 7. Put the spit on vertical sticks (16" off the fire). Start turning the meat. And don't stop for 4 hours. You had nothing else planned for today, right?

- Step 8. Introduce increasingly desperate reinforcements (e.g. nails, a clamp, a metal broomstick, more twine).

- Step 9. Get cocky and decide to clear some dead brush while lamb cooks. Throw pine branches on the fire, getting the fire so hot that you set ablaze the twine with which you wrapped the lamb, and watch helplessly as the meat falls into the raging flames. Rescue the meat and admire the "fire-kissed crust." Pretend this was all part of the plan.

- Step 10. Bring the lamb to the table. Ignore dogs. FEAST!

Sunday, April 14, 2013
Pasties (also: an easy puff pastry recipe)

Another experiment brought about because of River Cottage Every Day, even though all we used of that book here was the recipe for cheaty puff pastry. Cheaty because it isn't as complicated as "real" puff pastry, but I couldn't tell the difference between this and any other puff pastry I've tried, especially on those pasties in which the dough wasn't rolled out too thinly.

Puff pastry
[Makes 6-7 pasties]
2 cups flour
pinch salt
2/3 cup butter, chilled and chopped into small cubes
ice water
[I would recommend adding more salt!]
Procedure
Sift the flour and salt together in a large bowl. Throw in the cold chopped up butter and toss until all the butter chunks are covered with flour. I found it easiest to do this with my hands. Add the water a couple of tablespoons at a time, mixing it in with a wooden spoon, until you have just enough liquid to make a firm dough. The butter is still in chunks at this point.
Shape the dough roughly into a rectangular prism with your hands and put it on a well-floured surface. Flour a rolling pin and roll the dough out in just one direction (away from you is easiest) until it makes a long, flat rectangle -- about 3/8" thick. Fold the top third down and the bottom third up over that (like a letter) so that you have a rectangle that's three layers thick. Rotate 90 degrees and repeat the process. Roll out, fold, and rotate a total of six times. Then cover the dough with plastic wrap and put it in the fridge to rest for at least 30 minutes.
Meanwhile, prep the fillings (see below for some examples). When ready, preheat the oven to 375F and pull out the chilled dough and roll it out so that it's about 1/8" thick. Use a plate or pot lid to cut out circles (I used a smaller pot lid, which gave me 6-7 pasties from each rectangle of dough). Spoon the dough just off center, and fold the dough circle in half. Brush the edges of the pastry just a little bit with water and crimp them tightly, making sure the filling is sealed in. I think the more you can fit inside, the better it'll taste, but that's up to you. Brush the tops with an egg wash (use 1 egg beaten together with 1 tablespoon of milk), lay on a greased, foil-lined baking sheet, and bake for about 25 minutes or until golden brown.

Fillings
In this first and unreasonably ambitious experiment, we made four savory and one sweet type of pastie. This is a great medium for shoving it full of whatever leftovers or random ideas you have, so the following filling descriptions are pretty vague -- no exact amounts or instructions. You can figure them out yourself. :)
- Mushroom & Barley

barley
chopped mushrooms
cooked spinach
onions
salt
black pepper - Chickpeas & Curry

chickpeas
boiled chicken
red pepper
green beans
potatoes
curry - Butternut Squash & Chicken

boiled chicken
boiled butternut squash, pureed
potatoes
raisins (optional)
onions - Keema Matar

I made keema last night with this recipe and used the leftovers for this pasty. :) - Butternut Squash, Ricotta, & Raisins

boiled butternut squash, pureed
ricotta
brown sugar
raisins


Wednesday, April 6, 2011
How to make dipping chocolate
This might seem silly, because chocolate is an easy thing to melt. And in the technical sense, I agree -- it's easy to turn solid chocolate into liquid chocolate. But depending on your intended use, you can use the melting process to bring out all the delicious hidden flavors lurking behind that rich chocolatey goodness...
Whether you're dipping strawberries, truffles, biscotti, or just your fingers, the basics for making good dipping chocolate are:
When everything in sight is chocolate-dipped and you have produced delicious dessert to your heart's content, you might notice the gross sticky mess you've created in your double boiler. Scrape off any remaining bits of chocolate from the bottom of the bowl (though why would there be any chocolate left?!) and fill dirty bowl with water. Heat up the water (may as well use the saucepan/mixing bowl as a double boiler again), which will liquefy the left-over chocolate gunk and make it much easier to clean up.
Whether you're dipping strawberries, truffles, biscotti, or just your fingers, the basics for making good dipping chocolate are:
- Chocolate, and
- Butter
Use about a tablespoon of butter for every half cup of chocolate. Melt everything in a double boiler, stirring occasionally with a wooden spoon. [By the way, a double boiler is a bona fide uni-tasker. You don't need to go out and buy a double boiler -- just take a metal mixing bowl or any small saucepan, put it on top of a bigger saucepan which has some water in it, and bring the water to a boil. Then put all whatever you're melting into the mixing bowl or small saucepan on top.]


- Chocolate-dipped fruit
If you're making chocolate-dipped strawberries or whatever other fruit has caught your fancy (have you tried chocolate-dipped prunes? no, seriously -- apparently that's a thing that some people love), you probably want to keep the dipping chocolate as simple as possible. For this, just butter and chocolate will do. - Dipping something nutty
Maybe you're trying to add a chocolate layer to some biscotti, or maybe you're dipping truffles. Maybe you're just dipping nuts themselves for a quick & easy but still somewhat decadent dessert. Either way, the chocolate can be much richer this way. Exciting! So here are the ingredients for melting in the double boiler.
1/2 cup dark chocolate*Cleaning tip
1/2 tsp. instant coffee
1-2 Tbsp. butter
pinch of salt
* Sometimes I use unsweetened baking chocolate and sometimes a dark chocolate bar, whichever is on hand. Taste the chocolate mixture when it melts and add sweetener and whatever else until it suits you.
When everything in sight is chocolate-dipped and you have produced delicious dessert to your heart's content, you might notice the gross sticky mess you've created in your double boiler. Scrape off any remaining bits of chocolate from the bottom of the bowl (though why would there be any chocolate left?!) and fill dirty bowl with water. Heat up the water (may as well use the saucepan/mixing bowl as a double boiler again), which will liquefy the left-over chocolate gunk and make it much easier to clean up.
Subscribe to:
Posts (Atom)